Sunday, August 28, 2016

Tearing Down Walls!

So, this year, 2016, has been the "year of the house" for us indeed!  We are so excited and grateful for the changes we've been able to make to our house so far; changes that are truly making this home "us." 
By the grace of God, we have a place to call home; a shelter from the elements, clean water running from our faucets, beds to sleep in, a safe place to gather together.  This in itself is such a tremendous blessing...one that I know I take for granted at times. So, to simply have this place, I am beyond grateful.  But then to be able to do these fun things to make it truly ours and even more functional for our family.....WOW...I am just so very thankful and undeserving. 
I love creating and working with my hands; seeing the before and the after; the story and the transformation of something old and worn into something that highlights the beauty of the age and the scars.  I am inspired by so many creative and talented people in this world.  My hope in my posts about design and creativity is to inspire you as well!  And maybe to let you in on a few inexpensive and easy ways to make your home more you. 
We love to reuse materials, repurpose and find the most affordable way to diy our design wishes....such a fun challenge!
I recently shared our master suite renovation.  If you missed those and would like to take a peek, check them out here and here.
Today, I am excited to share another big renovation project we tackled over the last few months.  It is one that we envisioned from day 1 of looking at this house to buy.   Needless to say, 8 years later, we are a tad bit excited to see it a reality!

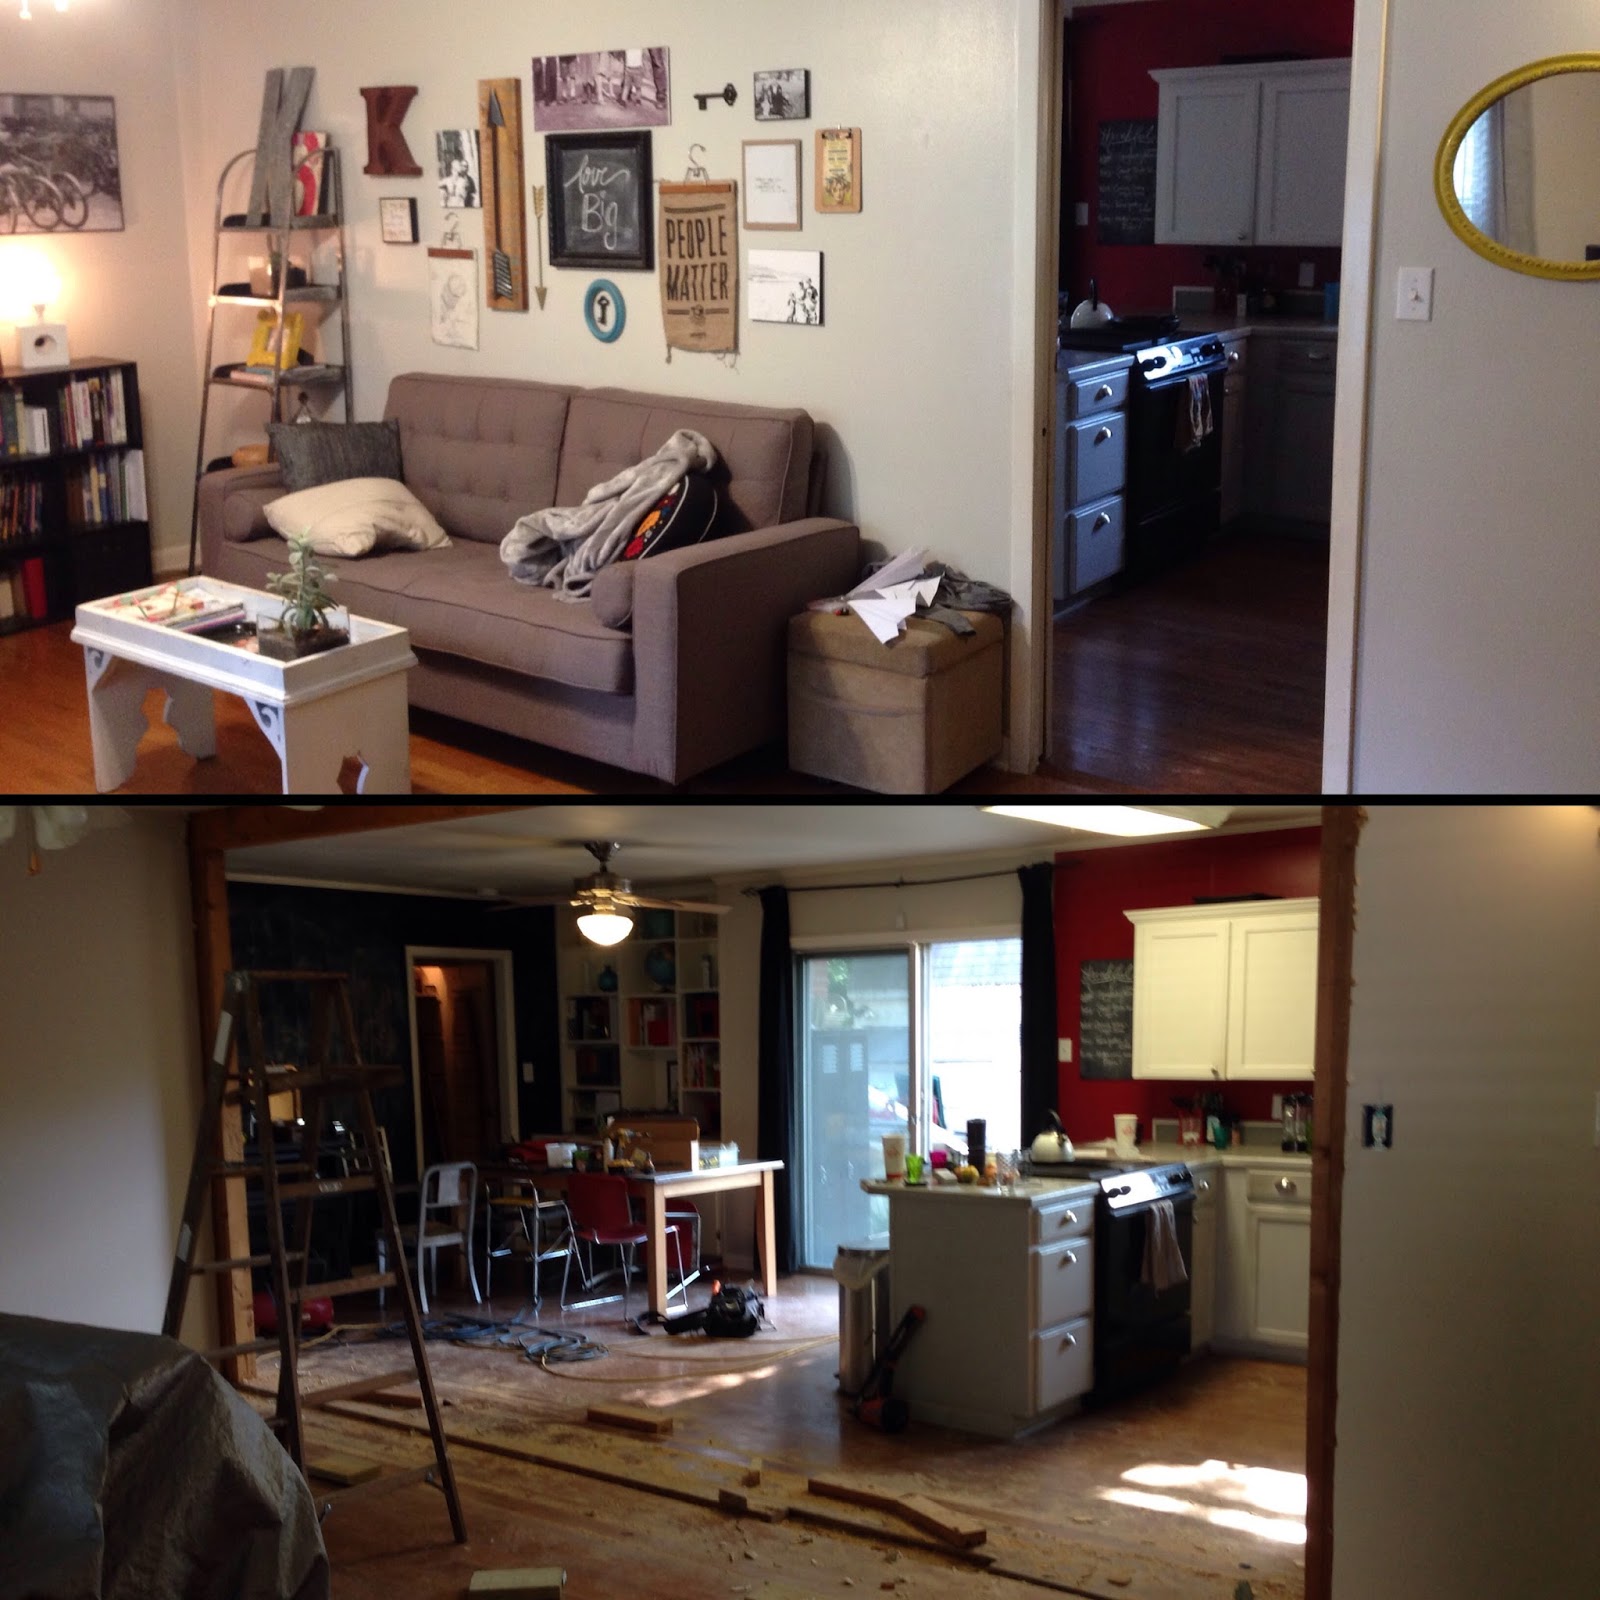
Here is the before and during of our living room project.  Taking down the wall! Woo hoo!
Here it is now finished.
I am in love. This truly changed the whole feel, flow, and function of our home.  I love that we are all together now.  The house feels so HUGE to me now!  We love having people in our home and this just makes that even more possible for more people to gather, which I just love so much.
So, please come on in and let me show you around.  Family movie nights, a lot of coffee drinking and stories shared, cuddles and reading, games and puzzles....so much life happens in this room.
Turn around and you'll find our entry way, my best find in years (our beloved old lockers), and the addition of a distressed wood wall. I love this part of the room.  Those lockers house all of the things that I have moved around from place to place in our home for years because we just didn't have a good place for them. We don't have a mudroom or a garage or even an extra closet that's not in use so these lockers hide backpacks, my workout gear, basketballs, hats and gloves, my purse, and our weekly library books so they don't get misplaced.


Natural light is a must for me and now even more of it floods through the windows from each room.
 I have wanted lights over our bar to replace the big fluorescent light that was there, forever!  I knew I wanted metal pendant lights and that I wanted them to hang from rustic wood.  My amazing husband took my wishlist and made it happen and he did so so good!

We painted our cabinets a couple of years ago and added hardware which seriously updated our kitchen. The light and sign over the sink are two of my favorite things in this space.  I looked for a long time for a vintage looking metal sign that fit the space and that I could afford and finally found this beauty!  And the light, I spotted at Vintage Market Days with my sister in laws and just fell in love with it.  My sweet sister in law snuck back over to that vendor later and surprised me with it.  Its one of those finds that I would've been kicking myself for not buying later so I am so glad she got it for me!
We also brought the wood element in here as well. It is a win win because it looks great and also doesn't show the little scuff marks from little feet like that the light gray paint did!  Just another one of the wonderful things about vintage industrial style, the more beat up it gets, the better it looks!
 Check out that light. I hear that it looks like the Death Star. Guess what? I had no clue! ha! I just knew that when my very excited husband called me over to see it on our trip to Ikea, I loved it right away! I love the ultra modern feel and that it is SO completely different than anything I've seen before.
I could tell he loved it too which sealed the deal.  Then he blurted out that it looks like the Death Star and after he explained what that was to me (I know, I know), I knew my kiddos would love it as well!

 mmmm....the coffee bar. This makes me happy.
That barn door though.  And the wood beams from the opening.  I just love it. 
Some sweet friends let us come haul off some old barn wood from their property a while back. We didn't know at the time what we would use it for but just knew we couldn't pass up barn wood!  It was absolutely meant for this project.
These lovely built in shelves were here when we bought the house and honestly, were a huge selling point for me.  We homeschool from our kitchen table so this space is super functional for our family! Those shelves and cabinets house our curriculum, workbooks, manipulatives, and art supplies. And the bright colors and globe are just happy to me.

Well, there's a little glimpse into our lives lately!  We have a few more projects to complete the year of the house but we've completed all of the really big ones now!

Next up: Creating a work space in the laundry room to make it a more functional work space, adding new lighting and freshening up the space with new paint.

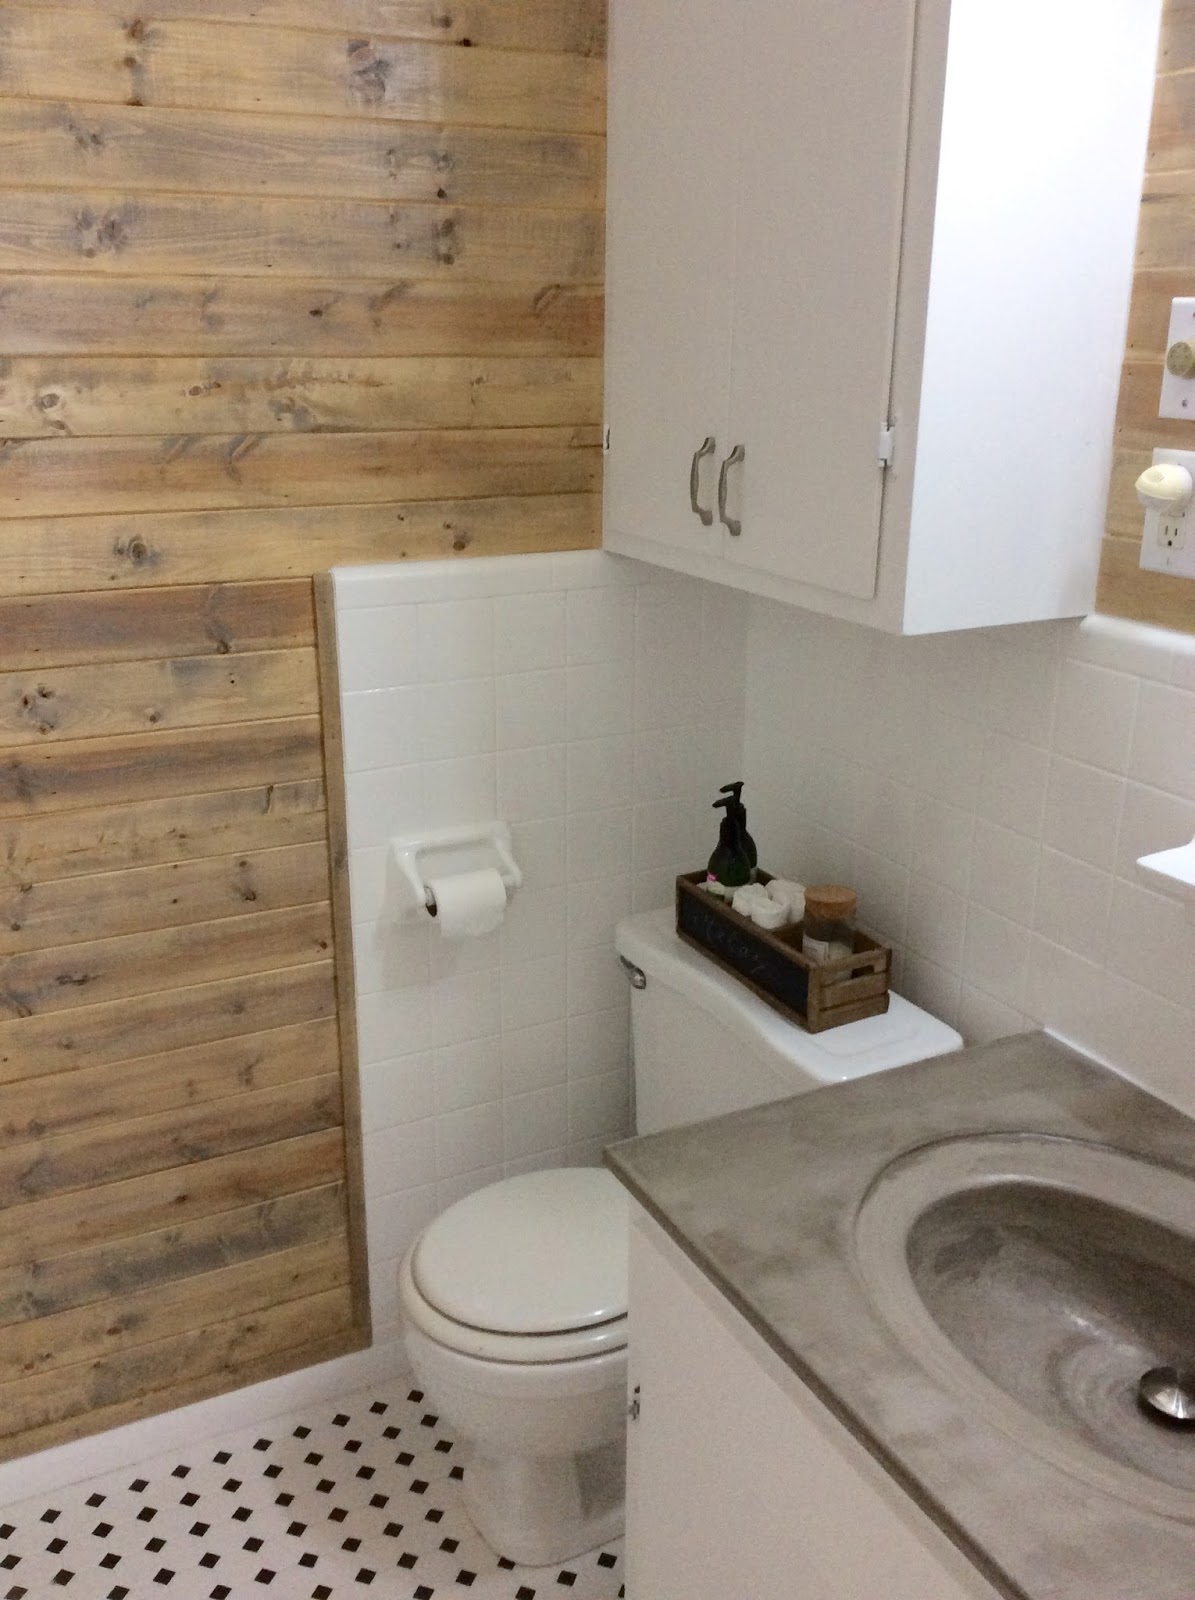
We'll be using the same process to cover the kitchen counters with concrete as we did on our new master bathroom. And we plan to add this tile to the backsplash
and paint over the red wall with a more neutral color that will brighten up the space. We will hopefully add some simple LED under the cabinet lighting and the kitchen will be totally done!

We'll be doing concrete counters in the other bathroom in the house as well and framing out the large factory mirror on the wall. 
And then....wait for it.....the year of the house will be a total success!!!

Posts on the details and how to's of these projects are coming soon!


Thursday, August 25, 2016

Diy Master Bath Renovation

If you missed the previous post on our master bedroom renovation, you can check it out here.
And now, moving on to the new master bath!  I am pretty smitten with this bathroom...for a few reasons.  One being, I've never had my own private bathroom.  Two, I love love love the vintage style tiles on the floor.  There are others, like every single thing about it, so I won't bore you with the long list!
Oh, first let's look at a few before shots!
 This is the floor before.
This is the sink and countertop before.
And somehow in all of the excitement, I didn't get a full shot of the bathroom before! *sad face*
The walls were the same dingy paint color as the before bedroom pictures, as well as the cabinets.  The tiles, as you'll see, were a light beige.
 The floor now. I love mixing old and new. This style reminds me of the original tile in many of the older homes.
 The sink now!  We covered the existing countertop with concrete. I actually tackled this one all by myself so I'm a little bit proud of it.
And the walk through to the laundry room.
And the walk through is gone, making this a true master suite!
Notice the color of the tile in the previous picture compared to this one. We used tub and tile paint and brightened up all of the wall tiles.  That stuff is no joke! The smell is super strong and toxic so use a heavy duty filtered mask if you choose to do this. But it did the trick and the tiles look like new!
We brightened up the cabinets with fresh white paint, added a new faucet, and went with a vintage round mirror to soften things up a bit.
And....a fun, quirky print on the wall. 
And the wood...I love the wood.  Our style truly is very industrial, mixing vintage, modern and raw materials.  Didn't my husband do an amazing job on the wood walls and trim?!  He did the construction part of most of this and I tackled a lot of the design and all of the painting and staining. We make a heck of a team!
We still need to add a towel rack to that wood wall, but it's coming.
 House renovation projects are as great as time as ever to get things organized! With this renovation, we ended up completely switching around 3 rooms in our house! So, guess what?!  We got even more organized as I was already having to take everything out of closets anyway.  Thanks to these cute, inexpensive plastic baskets from Walmart, our bathroom is nice and tidy.  I smile everytime I open these cabinets.
Did I mention that we did our complete master suite renovation in 2 weeks?  Yep. I like to go all in, get it done, and sleep later! My husband is a trooper and loves me so well. 
Still playing catch up on rest but it was SO worth it! I love working on projects with him and now we get to enjoy our new space.

I'll post more in depth on the "how to" for many of these projects soon!
I hope you're inspired to tackle some diy of your own!
If you're working on a project, share with us in the comments.


Wednesday, August 24, 2016

Master Suite Renovation

I am super excited to share this diy renovation project with you guys!  In 16 years of marriage, we have had our share of diy house projects.  Our first home was an old craftsman style home in the historic district of our city.  Oh, how we loved this house!  It was before kiddos, ya know, when we had time to peruse Lowes and Home Depot and dream and diy to our hearts desire.  We did a lot of cool remodeling in that home, which I'd love to share with you one day soon.
But for now, lets get back to the present.  I jokingly told my husband toward the end of last year, that 2016 was going to be the year of the house for us!  Only I wasn't joking. 
You see, we have lived in our current home for 8 years now.  The appeal of this home 8 years ago was the backyard, the neighborhood, parts of the layout, and the fact that it had just been remodeled. It needed nothing to move right in.  We moved in with 3 children, 3years and younger, the youngest being about 4 months old.  You see the appeal of it needing nothing to move right in? 
There were things we dreamt about, ideas for this house for the future, that would make it more "us."  But the only thing we immediately did was paint over the seriously outdated wallpaper in the kitchen.  I just could. not. deal. 
Now, 8 years later, and older kiddos and we are seeing things we dreamt up actually come to life.....and it's AMAZINGLY fun!
I might also add that in 16 years of marriage, we have never had a master bedroom or our own bathroom nor have we had any privacy since we began having children.  Yikes!  No really, when they were younger, this mama loved the peace of our bedroom being right next to theirs but let's be real...the time for a bit of privacy has come.
And without further ado....let's see the before of this room.


Bifold closet doors, dingy paint color, indoor/outdoor carpet (why?!), and broken pocket door. The bathroom attached to this room was sort of a walk through, having a door that went through to the adjacent laundry room as well.
This room has been used for various things but nothing ever really "fit" the space. It was a guest room for a while, which I love having, but it really only got utilized a few times a year.  We are a family of 6 , that homeschools, in a 1600 sq ft home...we need our space to function for us on a daily basis. It was the "tv" room but that didn't work at all because with all of the doors in this space, you couldn't really arrange any seating.  Then it was my art studio/work space. 
Now, it's our master suite.

Please, won't you come in?
This door....I love this door. We repurposed an old pocket door, added some wood, a paint and stain treatment, and barn door hardware.

It feels so fresh and clean and peaceful, which is exactly what we were going for. I am just giddy about it!
Do you see that floor?  We wanted the floor to look like the old wood plank floors.  We purposefully did not putty the nail holes in each wood plank.  I personally love the raw look of things, the imperfections. 
We used a bit more expensive sheets of plywood...yep, plywood!  They are cut into 8in wide planks and then we cut them as we laid the floor to stagger them.  Next, we thinned some white paint and white washed each piece until we achieved the look we wanted.  And lastly,  two coats of polyurethane.
These lights are one of the my favorites.  They dim! I know, silly, but like a kid, I totally played with the dimmer A LOT when we first put them up.  I saw some pulley brackets online for lights like these and fell in love with them, but not with the price. So...in true diy fashion, we used metal L brackets to achieve a similar and much more affordable look.


Can we talk about these closets for a minute?  These doors....oh goodness, I love these doors. Do you remember the before pictures of the bifold closet doors? These are the same doors!!! Check it out!

Yep. Pretty stinkin cool, huh?  I wish I could claim the ingenious idea but I can't.  I found it on Pinterest. I'll share more on the "how" later.
We built custom closets and every time I open the doors, the organization just sings to me! I've never had a walk in closet or anything like that and I am loving that everything is organized and right where I can see it.  The other fantastic thing about these closets is that everything is in our closets...no dressers...which means no clutter....which means my bedroom now truly feels like a place of retreat and rest.


A few custom art pieces I worked on for the space and I'm pretty happy with the result.  We could not agree on what to put over the bed and I was being super picky about anything we hung because the walls are so fresh and I hated to put a hole in them if we weren't absolutely sure!
I got out my embroidery machine, an inexpensive cloth drop cloth, and made a small piece with our anniversary date and this larger piece to go over our bed.  The piece over our bed, I just love. The words, "here by you I have no doubt" are song lyrics that my husband wrote...about me. *swoon*
I'll share details on those soon as well.


And one more custom piece that was just added.  I really wanted just small pops of this sea blue in the space; the glass vase on the floor, the paint on the wood in the piece over our bed, a candle on the night stand, the watercolor effect on the anniversary piece, but I felt like we needed something with a pop of color on our bed too, to pull it all together.
I love maps and globes so much. The color is just beautiful and it reminds that this world is SO big, that my Father is an amazing artist, that there's a whole world of people that need loved, and that I am actually a very small part of it all.  Puts things into perspective in a beautiful way.
So, I grabbed the same material from the same drop cloth and pulled out my paints and enjoyed an evening of creating. I really love how it turned out and can't wait to paint on some more fabric!

I'll post about the master bathroom next!  And I'll also post some more details on some of the diy projects. 
We've also taken out a main wall in our living space that I can't wait to share with you as well!
I hope we're inspiring you to take on some diy of your own!

Resources:
-wood floor- plywood from Lowe's
-wood on closet doors- inexpensive pine wood from Lowe's, Weathered Oak wood stain, and black distressing wax.  Hardware-Amazon
-lights- Amazon
-custom closet- repurposed wood from the original closet; Super white paint from Sherwin Williams.